This time's tool: 3ds Max 2017
This time it is rigging. We will add a skeleton and controller to the character that has been standing for a long time, and create a mechanism that allows you to intuitively add poses and animations.
First of all, let's decide the concept of the rig we will be building. Imagine what to do and not to do first.
A versatile rig that can handle anything doesn't make much sense. Even if a universal rig is created, it is often the trade-off for ease of use.
・ Emphasis on ease of handling rather than response capability ・
Beautiful deformation with a simple mechanism ・
General versatility of motion data ・ Does
not consider scale or special deformation ・ Does
not consider output to another platform
As mentioned above, we will keep in mind that it is easy to handle and as simple as possible. It eliminates scaling and deforming, which can be difficult and complex. Also, since it will be completed in 3ds Max including rendering, there is no output support to the outside. In addition to these, do not forget to lighten any concept.
Place the biped in the image of the skeleton
For the skeleton, we will use a mechanism called Biped that is standard in 3ds Max. It's suspicious considering compatibility with other tools, but it's easy enough to handle if it is supposed to be used only within 3ds Max.

Compensate for failure points with additional bones
First of all, let's adjust the weight with only the biped in order to confirm the broken part. The whole body model with the skin in the previous section is used as it is as the base for skin deployment, and later the skin weight is transferred to the production model including clothes. Although it is a model that will not be used eventually, adjust the weight carefully. [Video 00:00:00-]
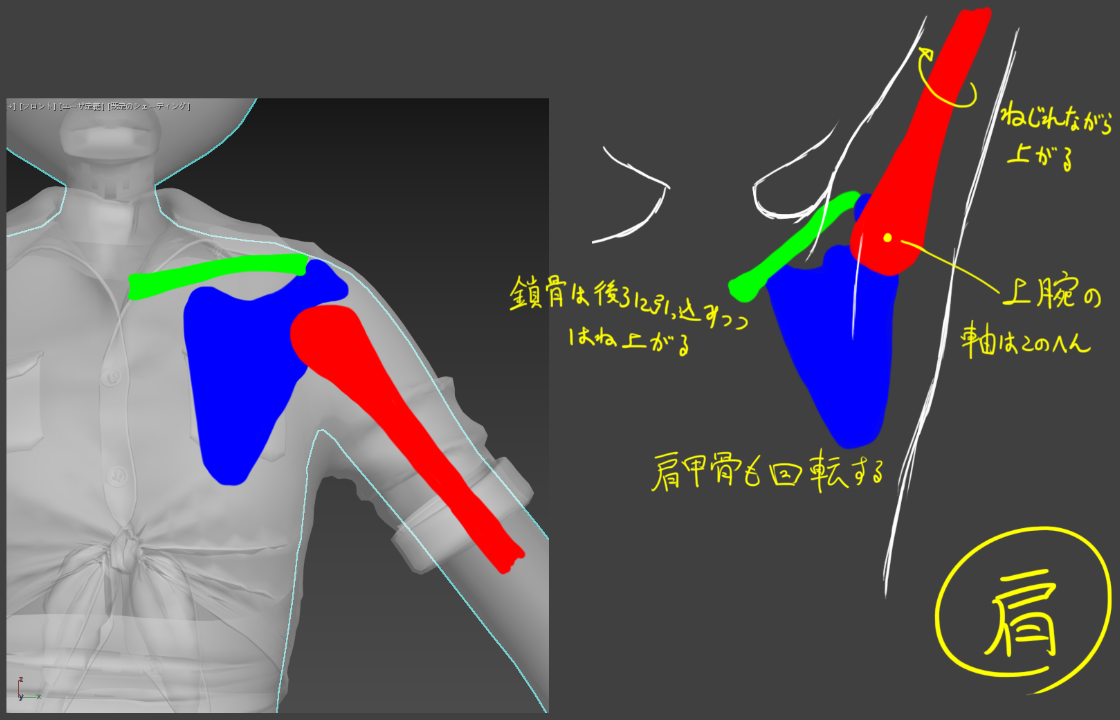
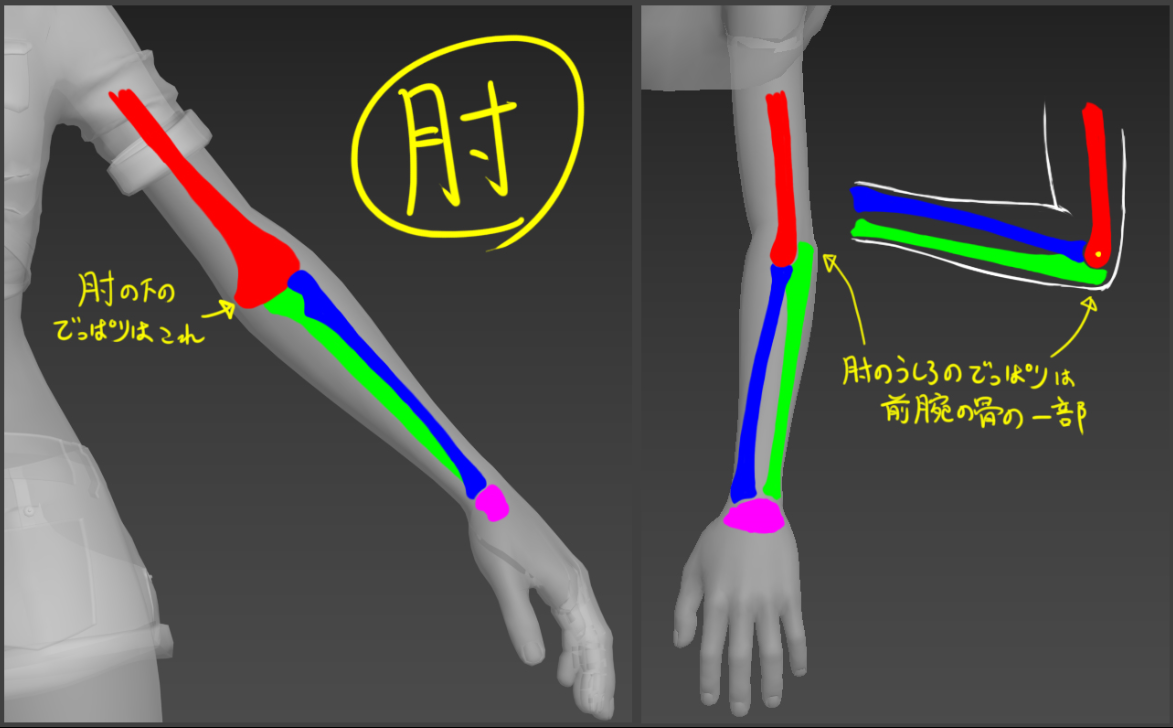
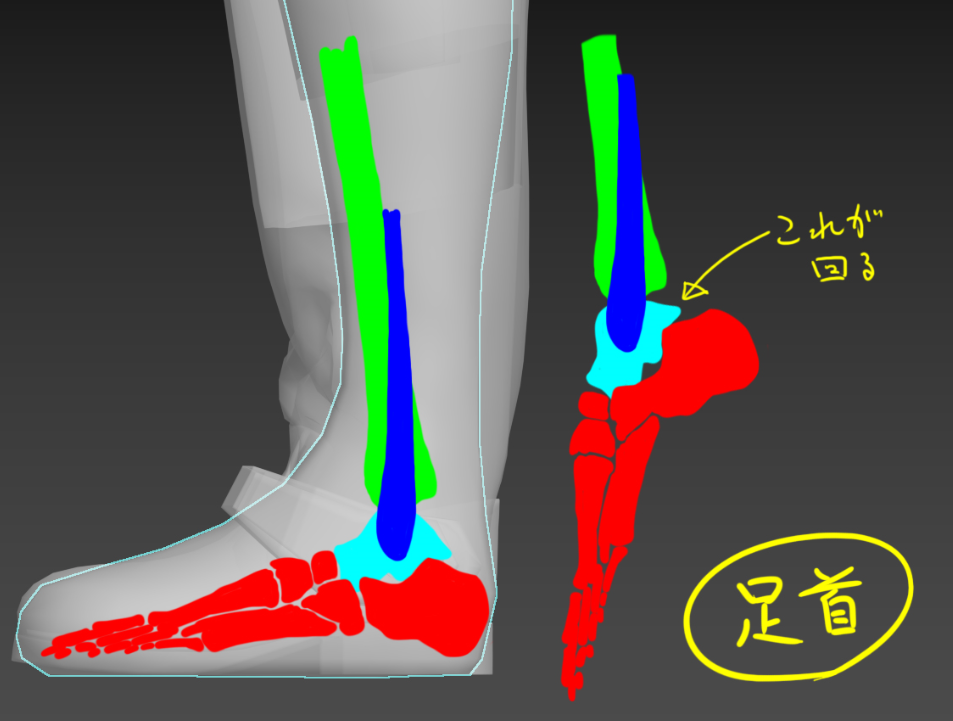
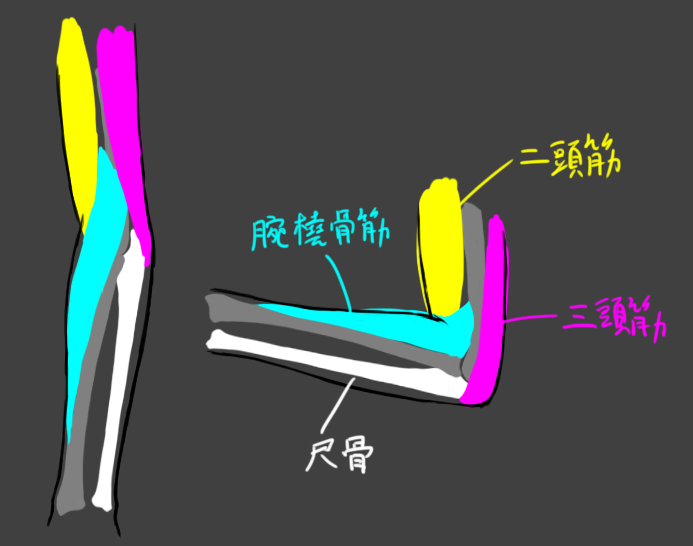
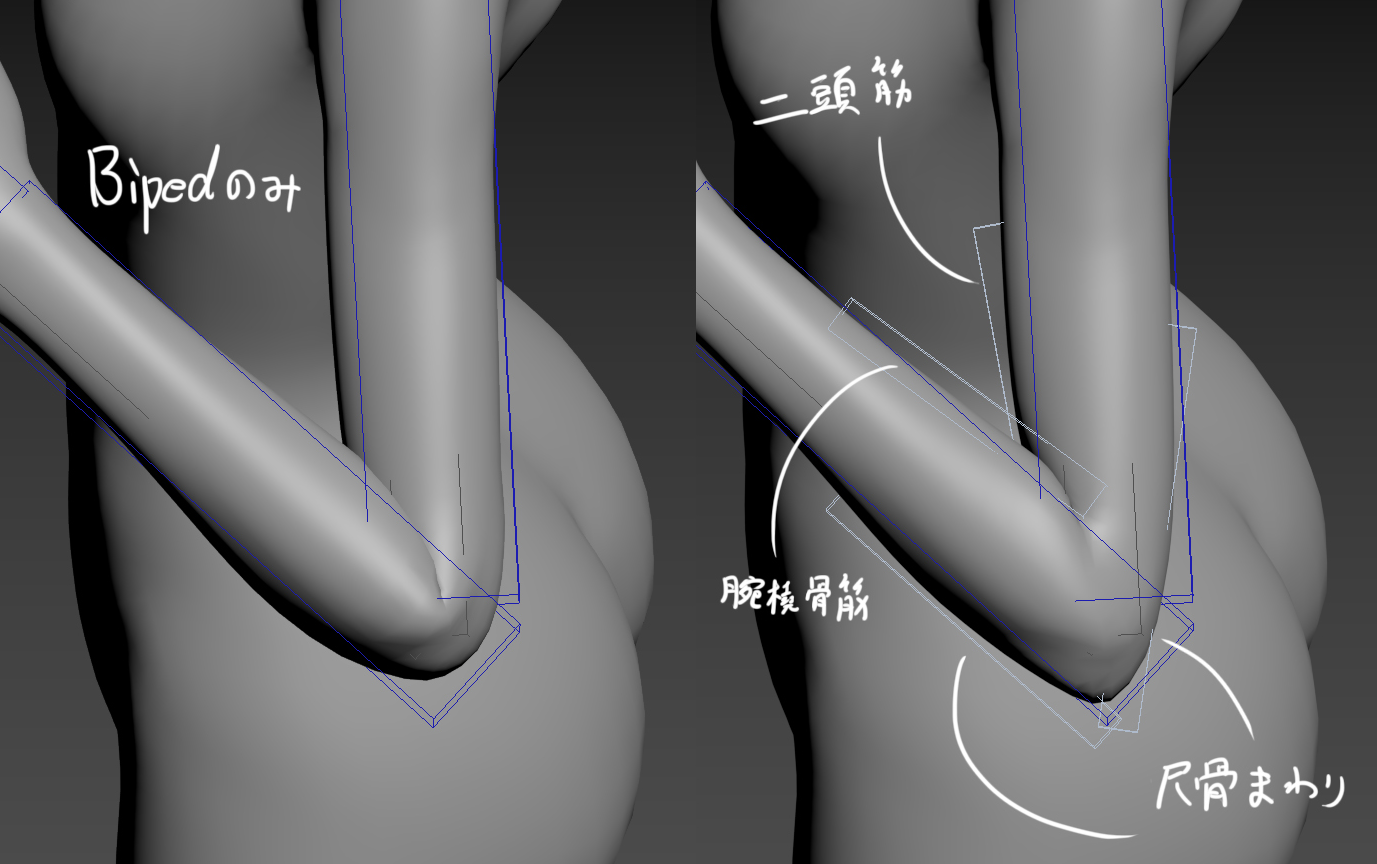
Let's look at the elbow. If this is the case, the collapse will be severe. There is no bone protrusion when bent. [Video 00:05:30-] This protrusion is due to the bones that make up the forearm called the ulna. Let's place the bone in consideration of this bone and the muscle around it.
If you create a bone with one link and apply the position constraint and look-at constraint to the end bone, you can make a bone that can freely expand and contract. Let's use this as the basic shape of the additional bone and reproduce the structure around the joint. [Video 00:06:05-]

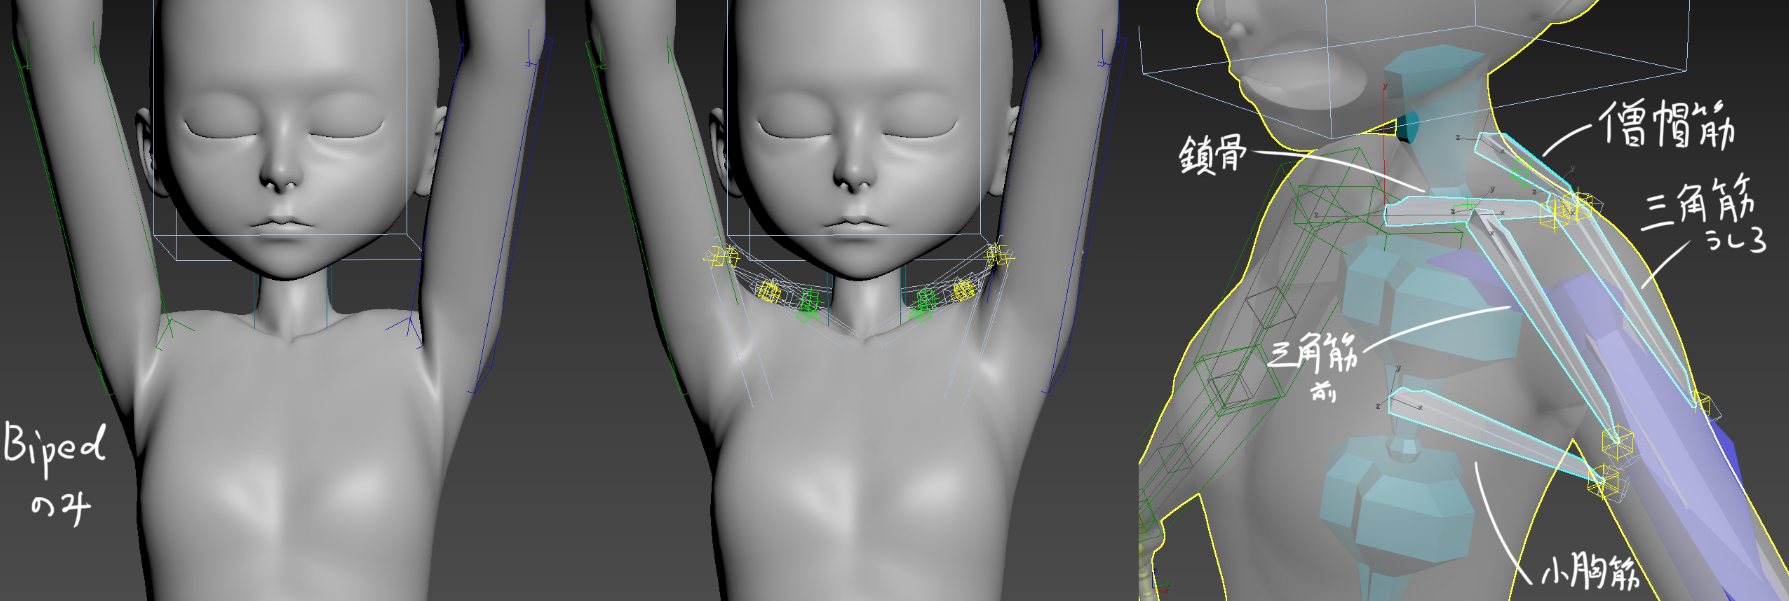
Furthermore, since the movement of the inside of the elbow is also a concern, try arranging the bones in the image of the biceps brachii muscle and the radial radius muscle. [Video 00:14:00-]
Add each bone to the skin modifier and use the weight tool to add weights for the corresponding parts. [Video 00:17:35-]
What do you think. I'm not doing a proper muscle simulation, so I can not reproduce collapse or expansion, but by understanding the structure and reproducing it in a pseudo manner, it seems that it looks quite decent without doing so much difficulty. think.
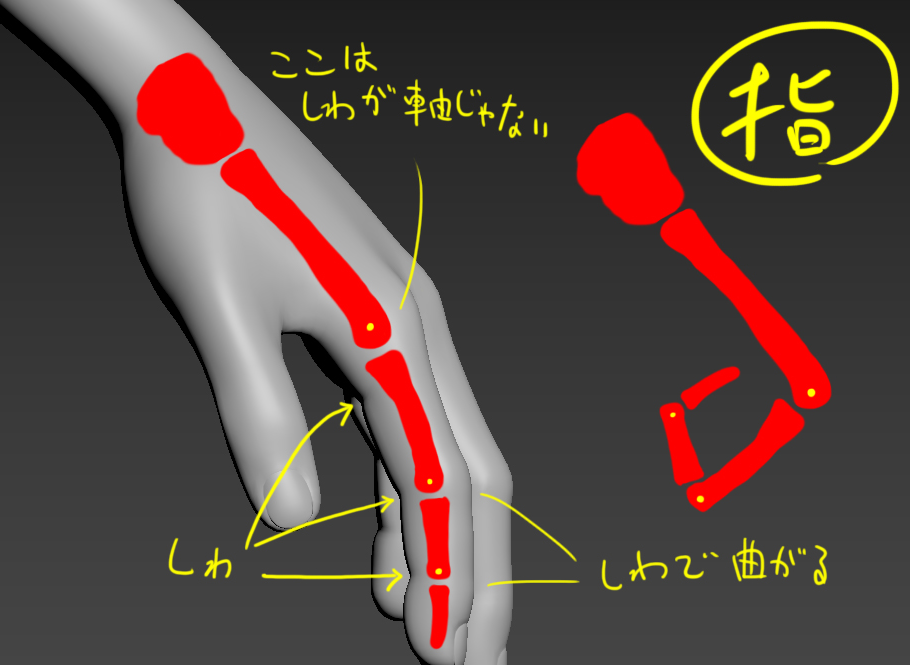
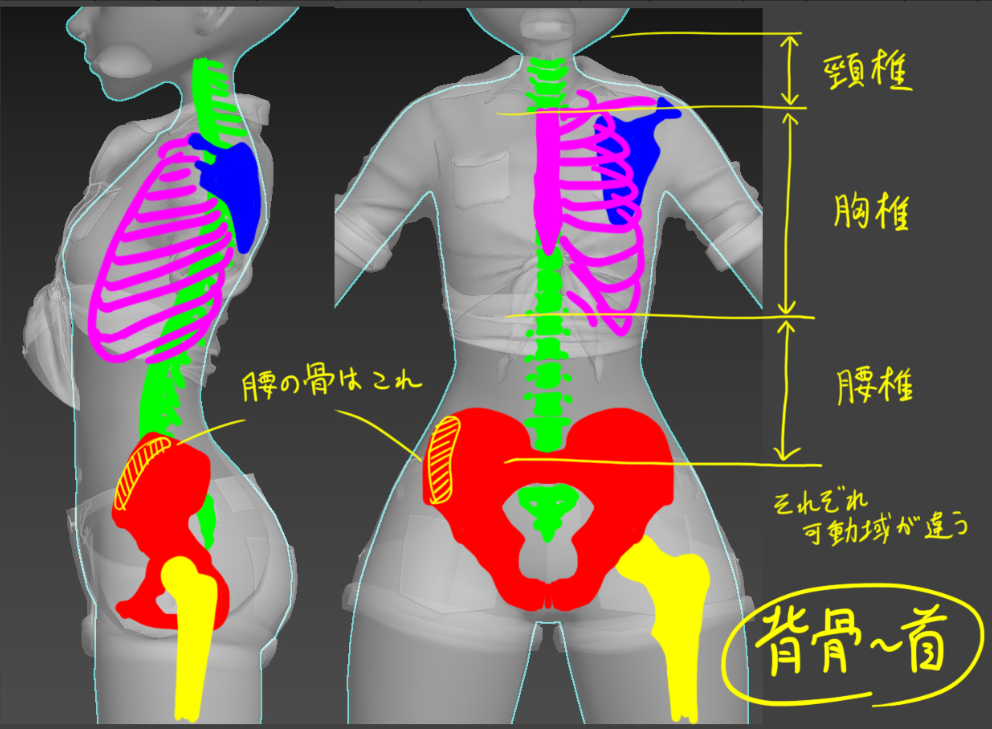
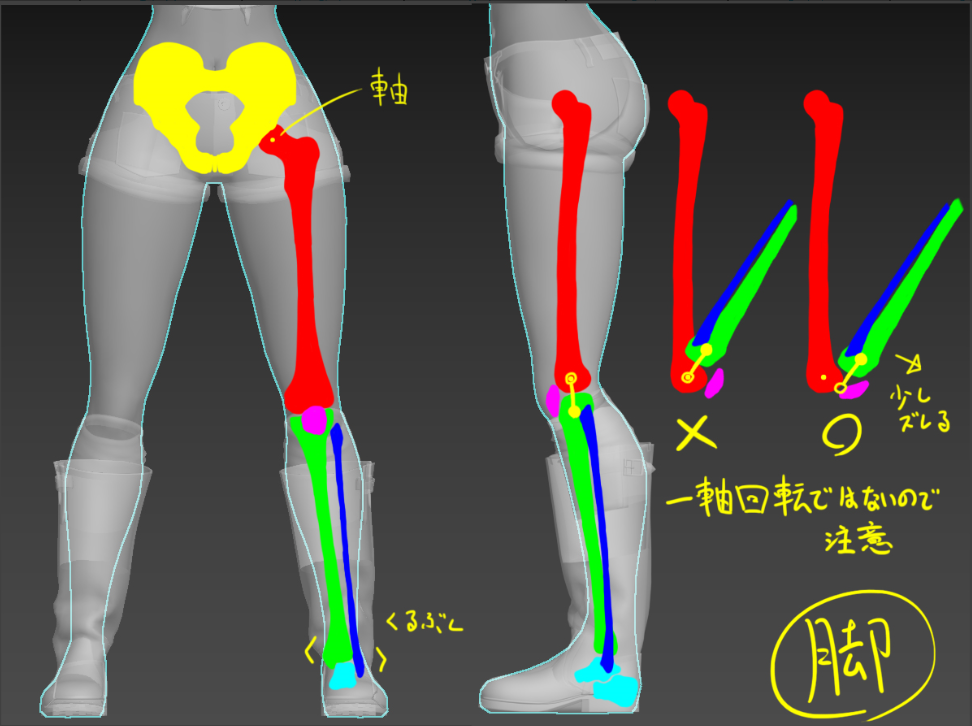
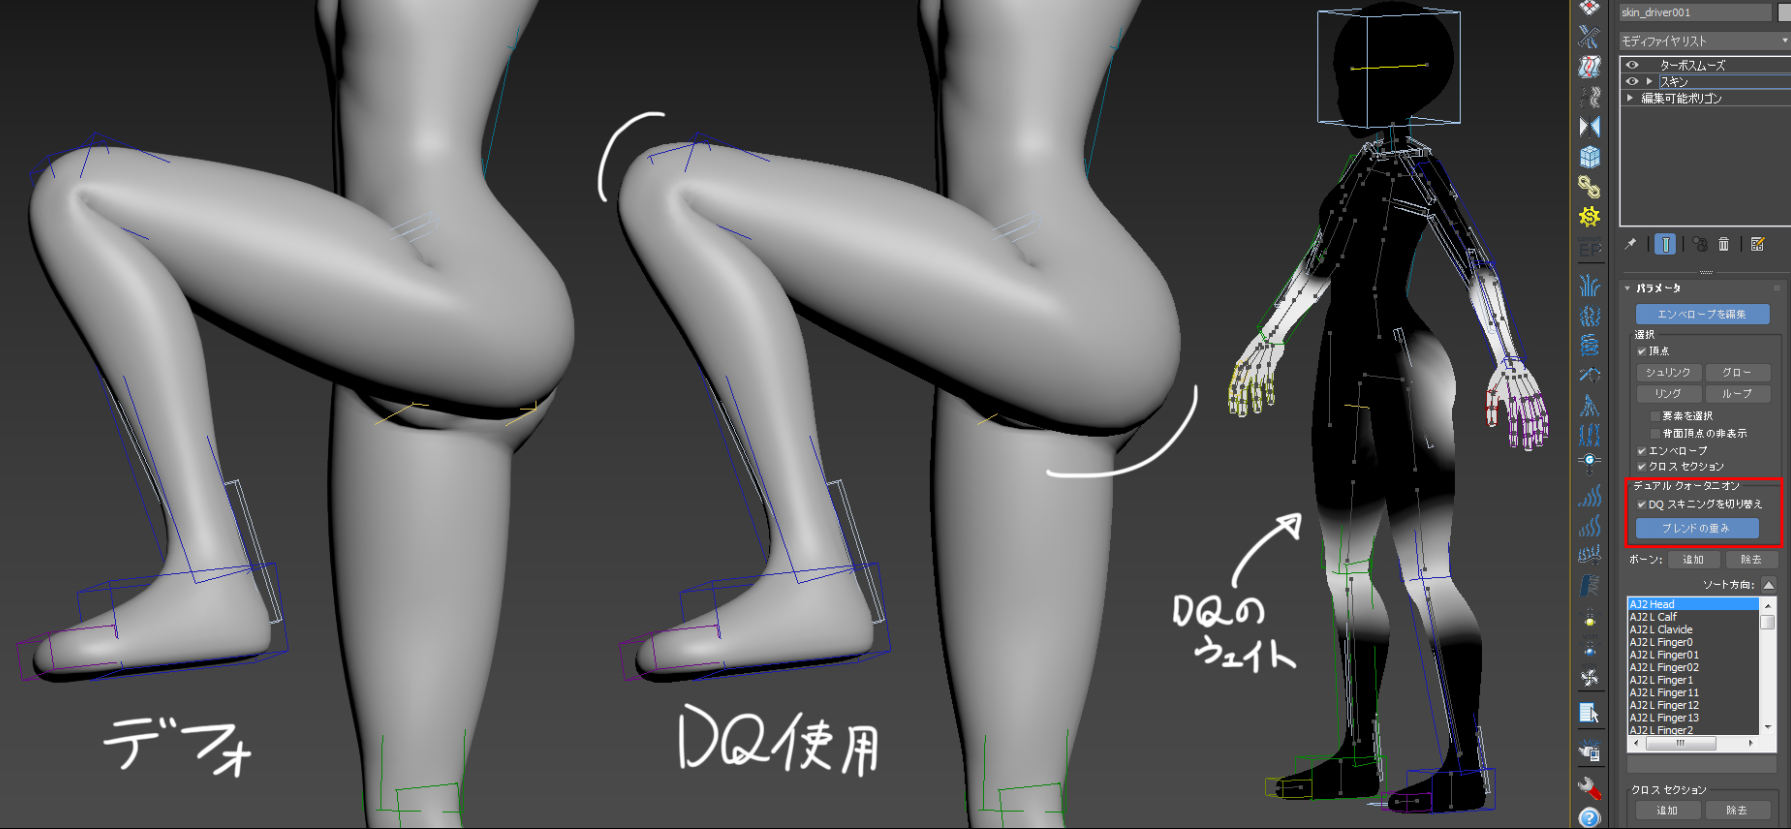
I tried to add bones to other parts in the same way. As for the knee, in order to reproduce the slide of the tibia, the position script controller controls the position to shift according to the angle of the knee.
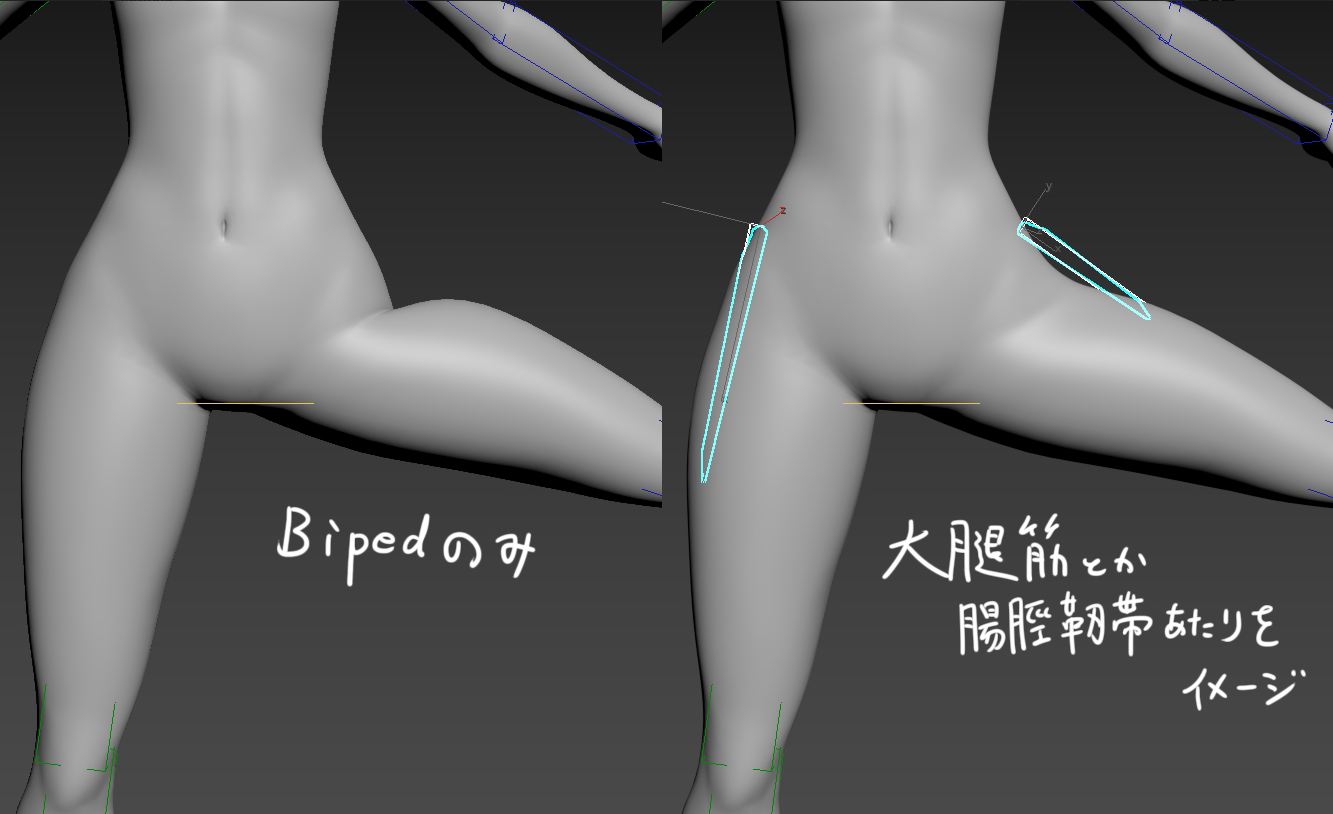
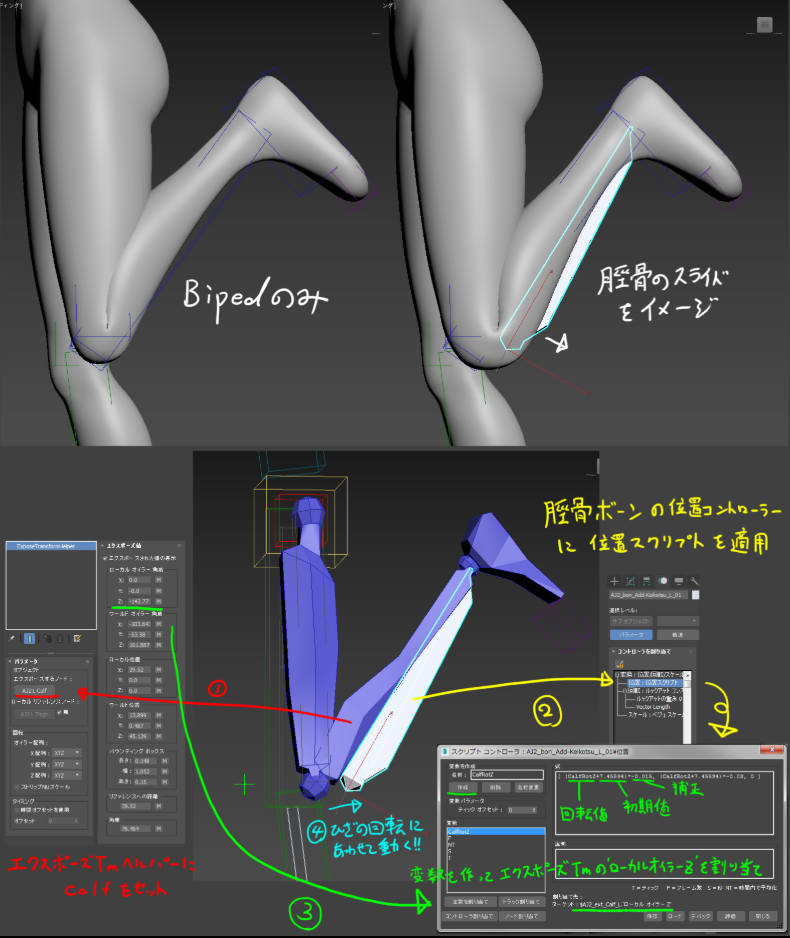
In addition, the weight of the dual quaternion is appropriately raised to avoid crushing in the part with strong roundness such as the buttocks and the part that greatly twists such as the forearm.
Organize your model before skinning
We will expand the skin from the base model for skin development to the model for production.
But first, let's clean up the model. Check before inserting the skin whether the vertices, edges, or faces are doubled, there are no isolated vertices, there are no polygon polygons, etc.
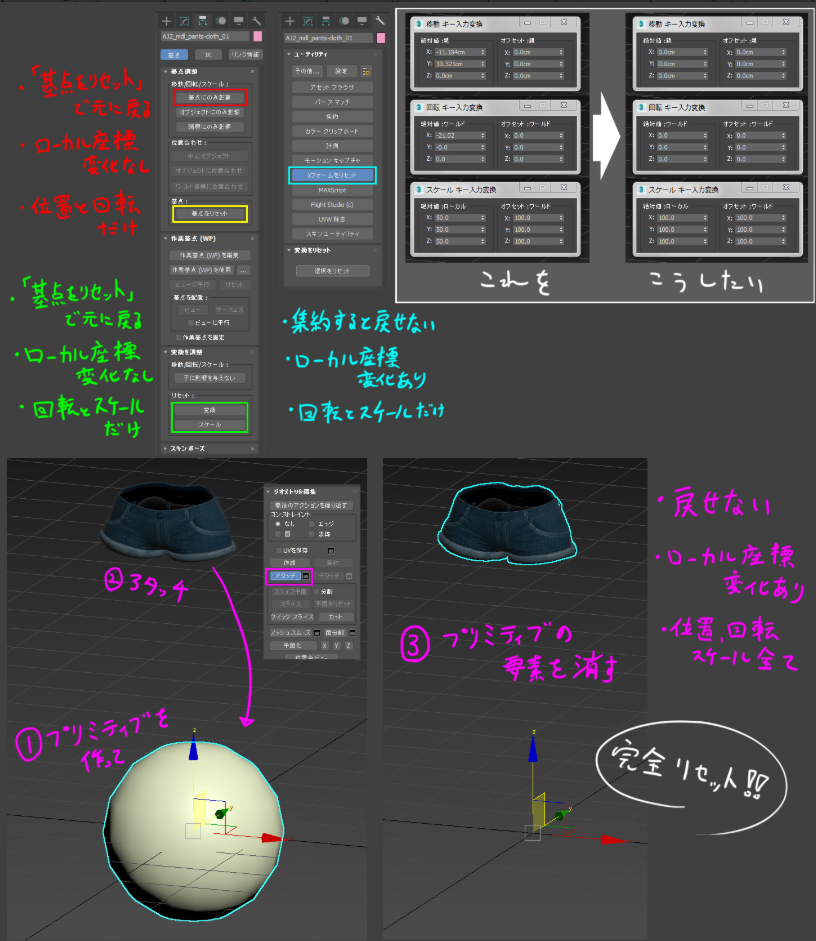
Also, all the position, rotation, and scale values that entered during modeling will be reset. The term “reset” here means that the position is [0, 0, 0], the rotation value is [0, 0, 0], and the scale is [100, 100, 100]. The most reliable method is "Create a new primitive ⇒ Attach the model you want to clean ⇒ Delete only the faces that make up the primitive". There are some standard reset-like features, but these are not sufficient for the reset here. I have summarized the features of each in the images below.
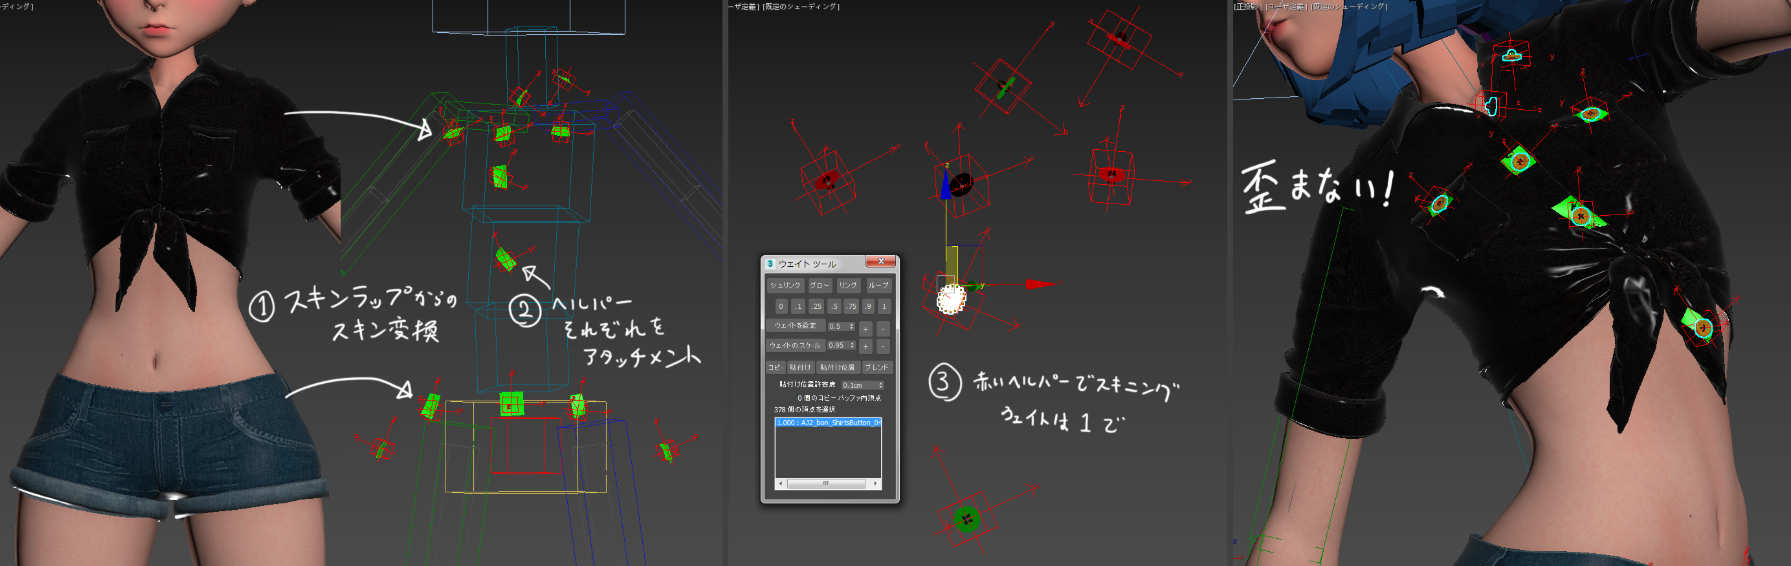
Buttons and buckles should not be distorted
A hard object (button, buckle, etc.) will be greatly distorted and unnatural if it is skinned like a body or clothes, so it is controlled by an attachment.
Considering that the surface number changes and the attachment shifts when Turbo Smooth etc. is applied, and that the load is high due to too many surfaces involved in calculation, it is not necessary to attach directly to the model for rendering and unnecessary. Prepare a mesh for attachment with the faces deleted
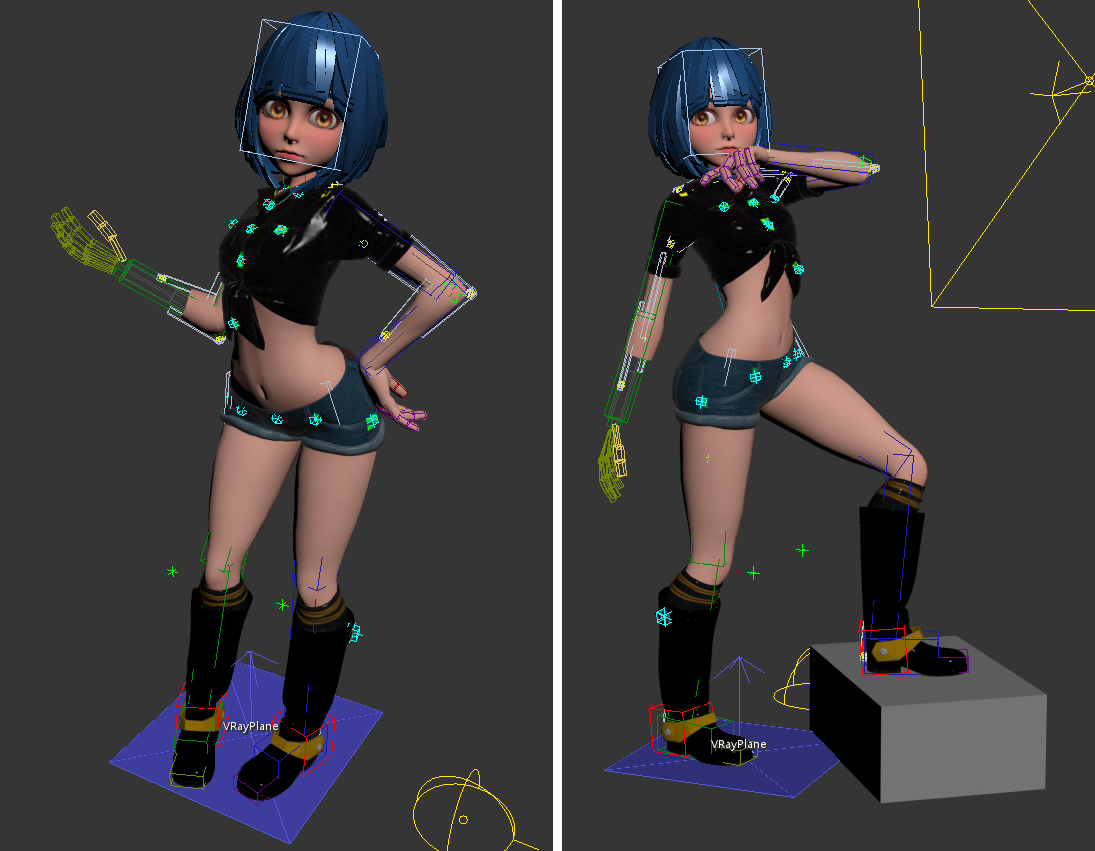
Now, this time I've done the basics of building a rig. There are still other things I have to do such as facial and right arm, but it is a very important process because the arrangement of the biped and the adjustment of the skin weight that I did this time are the basis. If this is not done properly, it often happens that no matter how much adjustment is made during the process of adding this fine rig.
Understanding the structure of bones and muscles is also very important. Of course, modeling will be useful knowledge for almost all processes such as bone construction like this time, and also about the range of motion when animating. There are many books on art anatomy for CG shops, so you may want to review the basics. There may be new discoveries.
Next time, we will build the rest of the rig around the facial. I want to manage my true face as quickly as possible!
see you!
评论回复